Today I’m sharing a super easy Ikea hack: adding legs to a Kallax bookshelf.
Reasons for Adding Legs to Ikea Shelves
Why would you want to do such a thing?
1. It looks cool. Adding legs instantly elevates (pun intended!) the look.
2. It could make accessing stuff a little easier.
3. Depending on the height, it could create some storage space underneath.
4. In some buildings, you might have vents or radiators near the baseboards. Raising your furniture keeps from blocking them.
5. It helps with vacuuming. On the one hand, you’re creating more area to vacuum when you raise furniture off the floor. But on the other hand, I feel like you can really get around a piece of furniture and vacuum better when it’s off the floor.
Using the Ikea Kallax as a Dresser for a Small Space
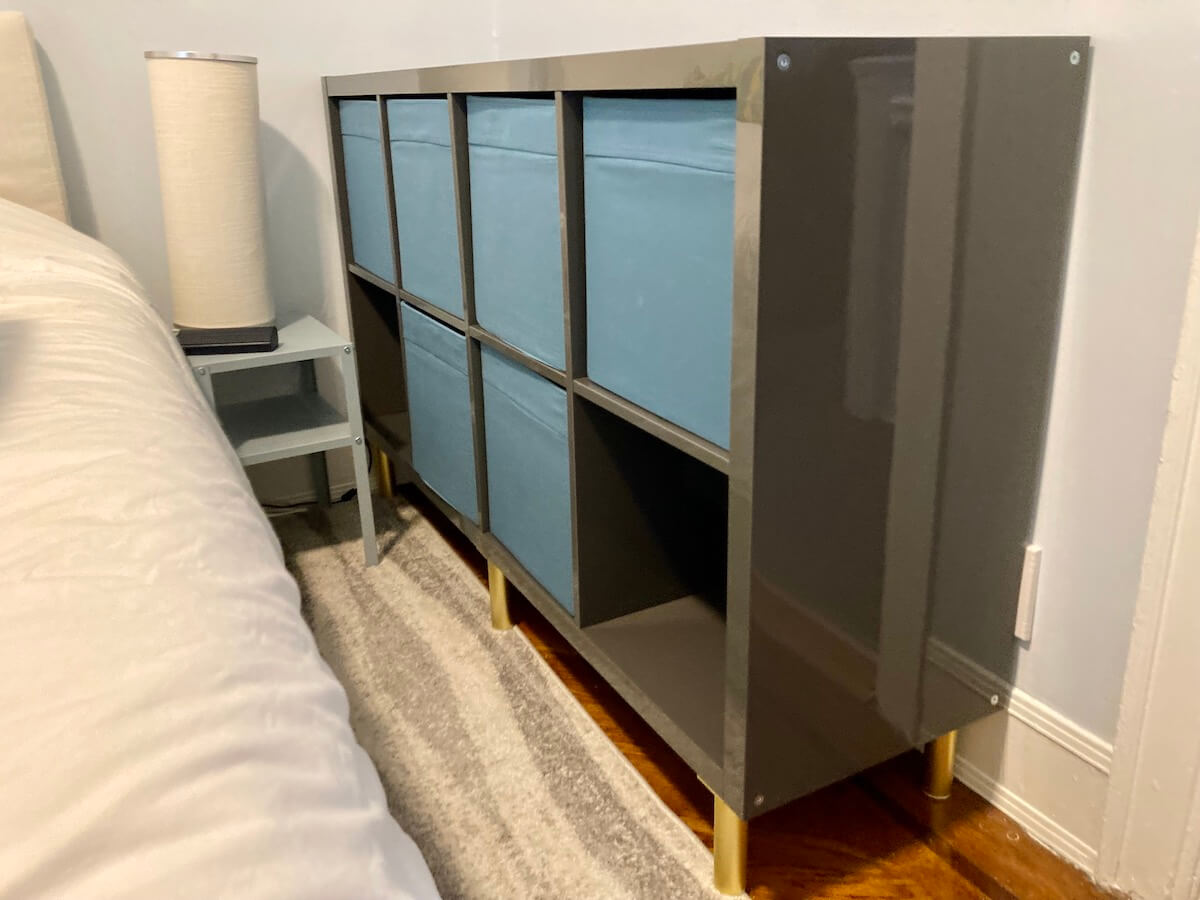
In my case, I wanted to turn a Kallax shelf into a dresser. The bedroom in my Brooklyn apartment is only 10 by 10 feet. A queen bed takes up most of the space. While I could probably squeeze a dresser in, opening it would be awkward. There’s just not enough space to both open the dresser and stand in front of it.
Most dressers are 18″ deep. Kallax is 15 3/8″ deep and those couple of inches make a difference. I also figured that cube storage is easier to access in a tight space than pulling out a whole drawer. (Another option is the Eket cabinet, which is even smaller at 13 3/4″ deep. Ikea even sells its own legs for the Eket.)

Ikea Kallax in high gloss gray (color no longer available) – $99.99
To store clothes, I added Dröna foldable storage cubes. (I’ll write another post about how to organize clothes in storage cubes. It’s a bit of a challenge since at 13″ tall they’re deep.)

Drona storage box – $6.99 (These used to be $5, but Ikea recently raised prices on a lot of items, probably due to supply chain issues.)
After I loaded up my things in the Kallax, though, I didn’t feel satisfied. Visually, it just seemed kind of heavy, especially in such a small room. So I decided to add legs. Raising it by 6 inches also made it a better height in relation to the bed.
Where to Buy Furniture Legs
There are lots of places that sell furniture legs. Honestly, shopping for the legs was the most time-consuming part of this whole process. A few places to look: home improvement stores, Amazon, and Etsy. There are also companies that specialize in this, like Prettypegs. (A word of caution: Etsy bills itself as a marketplace for handmade and artist-made items. While some folks on Etsy are artisans and woodworkers, there are lots of manufacturers that list to the platform and crosspost to Amazon too.)
For me, my requirements for furniture legs were:
- Brass or gold colored — I thought that would look best with the high gloss gray of my Kallax
- Adjustable since I live in a 100-year-old building and the floors can be uneven
- Available for purchase in a quantity of 6. To be on the safe side, I opted for 6 legs to better distribute the weight. But some sellers only offer furniture legs in sets of 4.
- Budget of $35
I ended up buying these gold-colored aluminum legs on AliExpress. They took about a month to ship from China.


Assembling the Legs onto Kallax
Adding the legs to the Kallax didn’t take long for me and the Mister. First, we placed the legs where we wanted them. Then I taped them down with painters tape.

Next, we made pilot holes with a nail. Just a few taps will make a hole to help guide the screw in.

Then, we screwed the plate into place. Because Kallax is kind of hollow — the frame is chipboard or fiberboard, but the inside is a honeycomb filling structure made mostly of recycled paper — it’s not hard to use a screwdriver by hand.

But of course, things go faster with a drill if you have access to one.

Once we had the metal plates in place, we screwed on the legs.

OK, here they are all in place. Time to flip it over!

Tada!

Here’s where our Kallax lives. See, I’m not kidding about it being a small room. My nightstand (the Knarrevik) is right between the bed and Kallax, so I only keep things I don’t need to access often in that bottom left cube.

I wish I had room to take an after photo of my Kallax with legs from the front view. But in between the very first photo in this post and this last one, my bed arrived. So, I can no longer get a clear shot of the Kallax from the front. I even contemplated moving the Kallax out to another room to get a photo for the sake of bloggery, but eh, that’s a lot of work. (If you’re curious about the bed, check out my review of the Thuma bedframe and Saatva mattress I decided on.)
It’s a small change, but I feel like the legs make a difference. It looks a little more luxe. Plus, I like to tuck my slippers under it.
If you’re thinking about adding legs to a Kallax shelf, go for it. It’s an easy transformation.
UPDATE 7/1/22 – I just noticed that Ikea is finally offering their own legs for Kallax. They sell this square-legged metal base in white and black for $27. I don’t remember seeing this option when I was furnishing my apartment in the fall of 2021, so it must be new. (The oldest review on their site for this product is from December 2021.) Not bad! Of course, hacks are still the way to go if you want a different look.


Love a great IKEA hack! While we’ve been slowly upgrading much of our furniture, when it comes to desks and bookshelves I’m still very happy with our IKEA pieces. And love that they can be spruced up with minor creative modifications.
There are definitely some great Ikea pieces that don’t make sense to replace. Some stuff has really lasted over the years. (Not all of it, but the pieces that do are champs.) When we moved into this new apartment recently, I didn’t want to get everything from Ikea, but we still ended up with lots. Can’t really beat the value.
This fails because the screws don’t hold in a hollow core plank.
It’s true that Kallax’s honeycomb interior doesn’t make for the most sturdy situation with screws. But so far (two years in), this has held up. I’m not storing anything super heavy in it, though.
Great tutorial! Have you noticed any splitting in the chipboard or exterior varnish over time? I have the same piece I’d love to try this with.
Glad you found my post useful. No, I haven’t noticed any splitting, just a tiny nick to the varnish on top, but the top surface is a high traffic area since we treat it like a dresser.
As far as I could figure from various pictures on the Internet, there are narrow strips of particleboard along the edges and where pegs are. I would use a stud finder to find out where it’s safe to put in screws. In any case, to be sure I would attach these legs to strips of plywood spanning from the back to the front. You don’t want to find out that the leg base caved in on the inner side where there is only a 3mm sheet of MDF for support.